DIYing a Basket Weaved Wooden Stool
We have a little series called DIYing Your DM’s over on our YouTube channel and this week I tackled a couple new projects that I am super excited about! A couple photos of different basket weaved stools and benches were sent my way, so I thought I would try and take a spin at making one! But if you are not in the mood for a tedious process like weaving, I will link a few options below that are very affordable from some small businesses!
Here is how I made it…
First things first, we need to cut out all our dowel pieces. I want my stool to be a foot high, so I am cutting all my pieces to a foot. I first cut my 2” dowel into 4 pieces (each a foot in length) and then my ⅞” pieces into 8 pieces (each a foot in length).


Now that I have all my pieces cut, I am going to start sanding. I marked an inch in on each side of all my ⅞” dowels and sanded a tapered edge to that marker on every end. This is to be able to easily hammer them into the thicker, leg dowels.
I gave a quick sand to the bottoms of all my 2” dowels as well to match the aesthetic of the other pieces and give it more of an organic look with a clean taper.


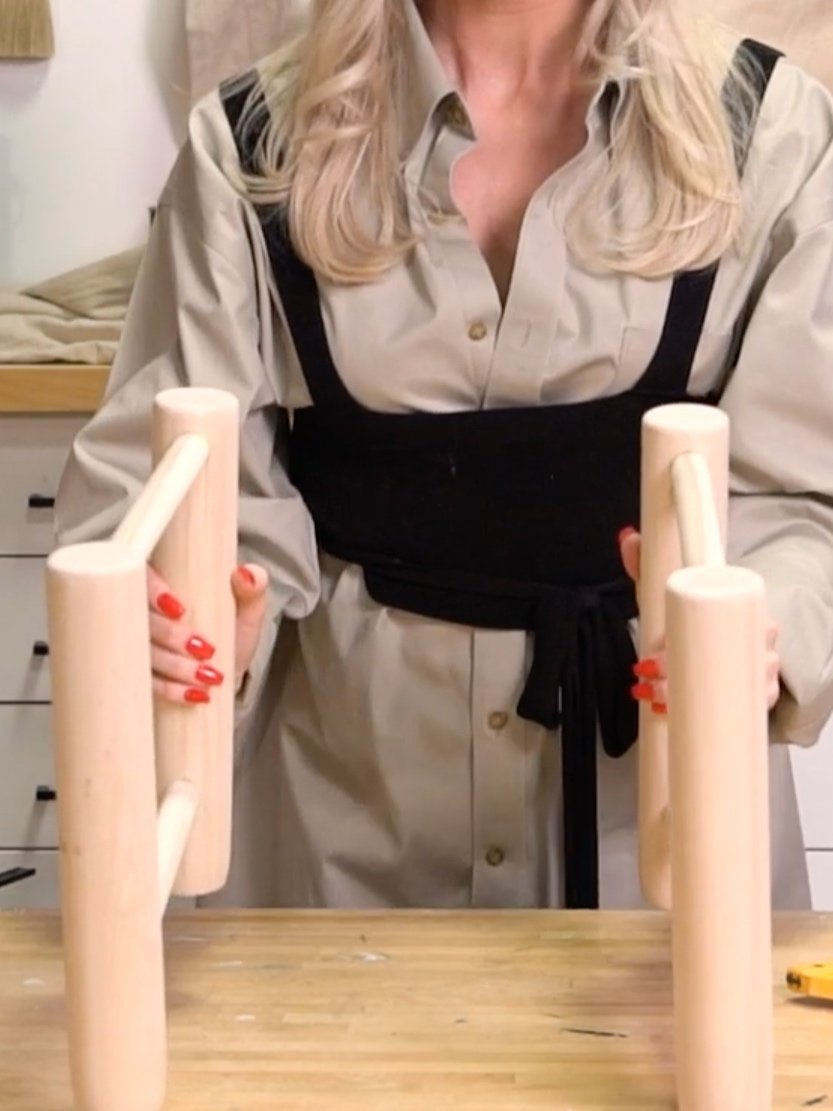
Now that everything is sanded, it's time to start assembling the stool. I needed to make drill holes for the smaller dowels to go into, so I am using a ¾” drill bit and drilling 2 holes on each end of the leg pieces (on one end drill an inch from the edge and on the other go up 3”). I attached a tape marker on the drill bit to ensure all the holes are the same depth.


Now with a hammer, some wood glue and my smaller dowels, I am assembling the two sides of the stool. I used a right angle ruler to ensure that all the angles are square. You should now have two square sides to your stool.


To connect them together, repeat this process on the corresponding side, creating one connected piece. You now have your stool!!


Next, we are using the sisal twine to weave a seat onto the top. I used a basic basket weave pattern here.
First, tie a knot to start your basket weave, then wrap your twine around the perpendicular dowel creating a loop across the top. Use a piece of wood like tambour or another dowel to separate the twine in between the top and bottom. Wrap it around 8 times. After your 8th full loop, wrap your twine around each dowel individually and then continue to repeat until the full top is covered with your twine wrapped in one direction (this is called your warp).
Next, to work on the weft, weave the spacer over and under every 8th string so that you have a clear path for your string to pass through. I used a piece of cardboard and wrapped my string around so it was easier to weave through. This process can be hard to understand without seeing the process, so be sure to check out the full video (linked below) for visual detail!.


And here are the final results!


Check out the full video here to see the process and get a visual of these steps!
